


Itip Extensions Care Made Easy: Brush, Wash, Slay!
Gorgeous Hair Made Simple: The Ultimate I-Tip Extensions Care Guide
Proper itip extensions care is essential to maintain their beauty and extend their lifespan. If you're looking for a quick guide to caring for your I-tip extensions, here's what you need to know:
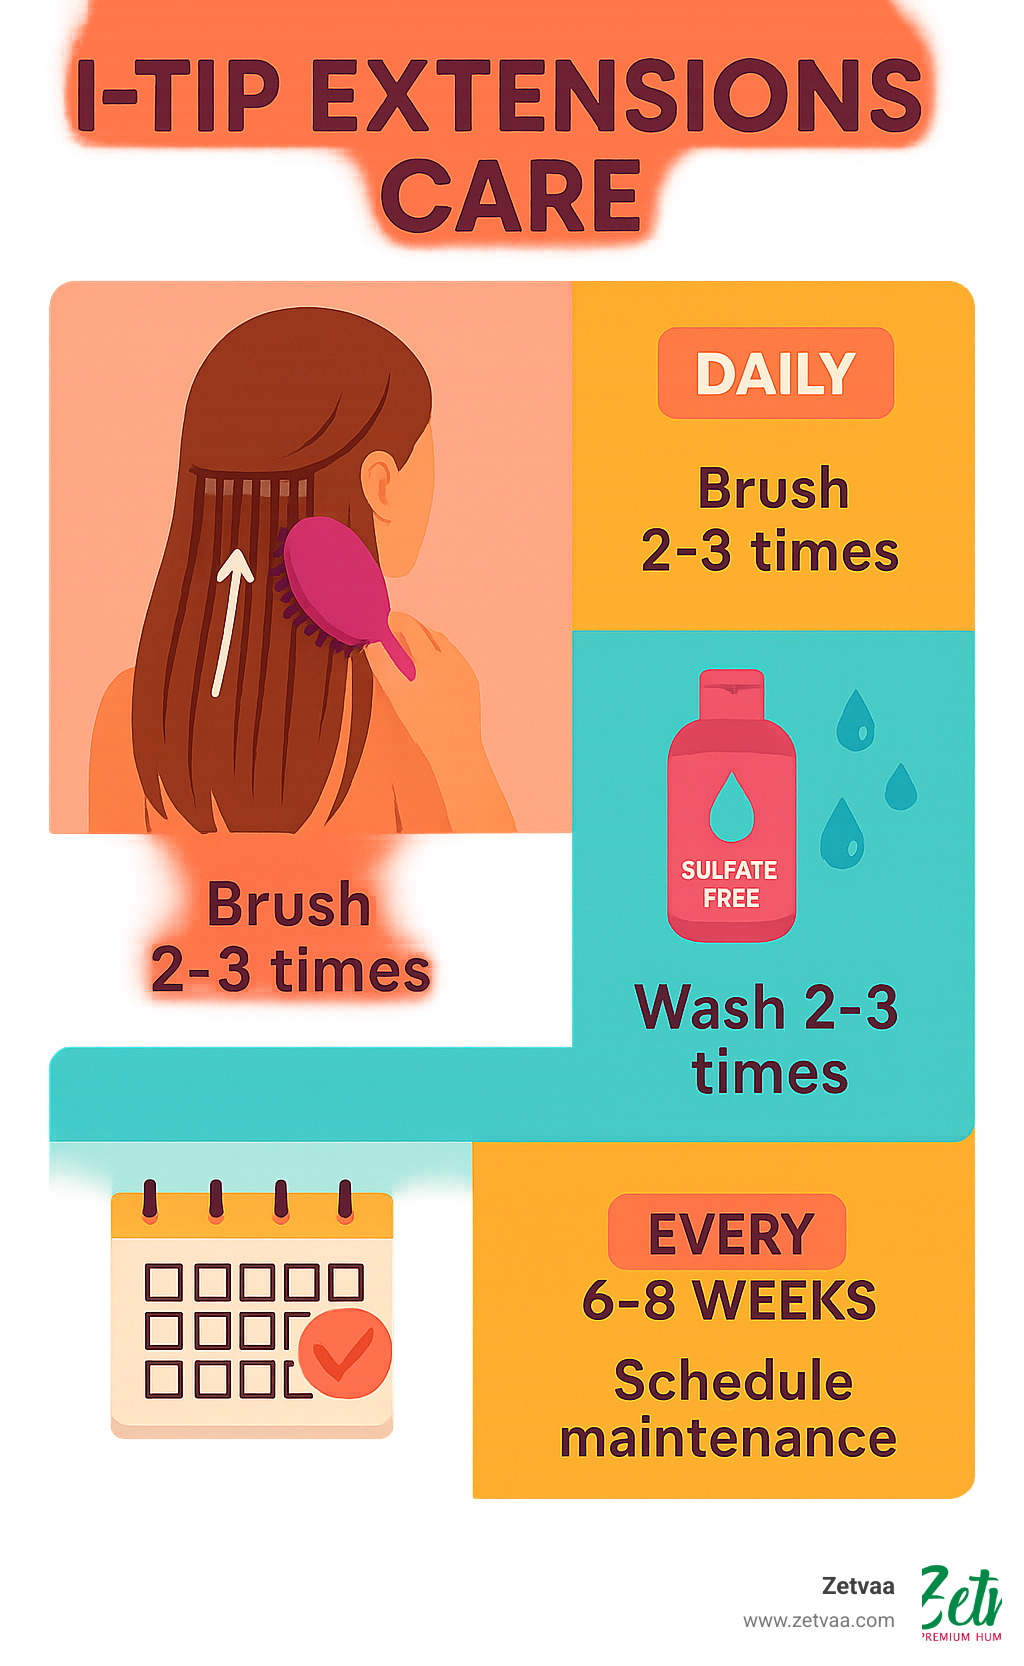
- Daily Care: Brush 2-3 times daily with an extension brush, starting from ends and working upward
- Washing: Use sulfate-free shampoo 2-3 times weekly; condition mid-shaft to ends only
- Products: Avoid oils, silicones, and protein-heavy treatments near the bonds
- Maintenance: Schedule move-up appointments every 6-8 weeks
- Drying: Never sleep with wet extensions; blow-dry on low heat after air-drying to 75%
I-tip extensions (also called micro-bead or individual extensions) offer a heat-free, adhesive-free way to add length and volume to your hair. Unlike fusion or tape-in methods, these strand-by-strand extensions attach with tiny silicone-lined beads, making them gentler on your natural hair.
With proper care, I-tip extensions typically last 3-6 months before needing replacement, though the high-quality ones can be reused up to 3-4 times with new beads. Premium full-cuticle I-tip extensions can even last 12-18 months with excellent maintenance.
The beauty of I-tips lies in their versatility and natural movement. Whether you're adding volume to thin hair or creating dramatic length, these extensions can transform your look while maintaining hair health—but only if you follow the right care routine.
In this guide, we'll walk through everything you need to know about caring for your I-tip extensions, from daily brushing to washing techniques that maximize their lifespan and keep them looking salon-fresh.
I-Tip Extensions 101: Installation, Benefits & Longevity
Let's explore the wonderful world of I-tip extensions! These little miracles are individual strands of hair with a shoelace-like tip (without keratin) that transform your hair game without damaging your natural locks. What makes them special? They're installed strand by strand using tiny silicone-lined beads made of copper or aluminum—no heat or glue required!
For that perfect balance of natural look and gorgeous volume, professional stylists typically use between 100-180 individual I-tip strands. Since most packs contain about 50 pieces, you'll usually need about 3 bundles for a complete change that turns heads for all the right reasons.
What truly sets I-tips apart is their zero-heat, adhesive-free attachment method. Those clever silicone-lined beads grip your natural hair without causing damage, and when properly installed, they move so naturally that no one will spot them (unless you want them to!).
At Zetvaa, we're pretty picky about quality—that's why we use only premium 100% Remy human hair for our I-tip extensions. "Remy" isn't just a fancy word; it means all cuticles run in the same direction, which prevents that dreaded tangling and matting. The result? Silky smooth extensions that blend flawlessly with your natural hair.
Installation Step-by-Step
While we always recommend seeing a professional for I-tip installation (trust us, it's worth it!), understanding how they work helps you take better care of your gorgeous new locks:
-
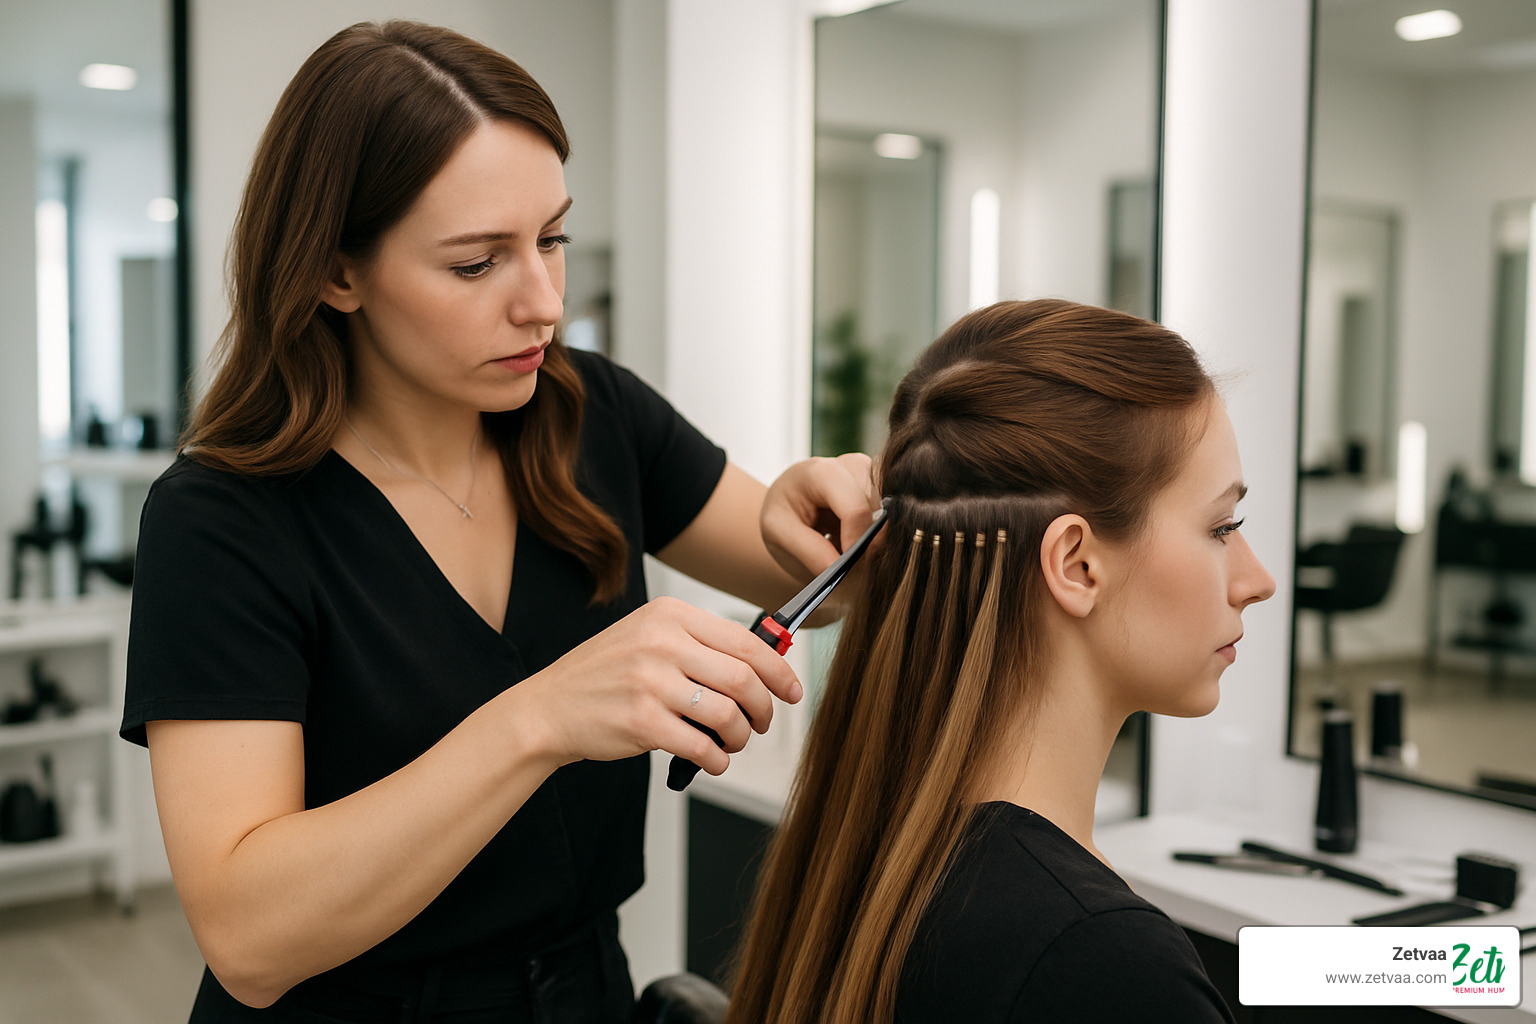
Preparation: Your stylist starts with freshly washed and dried hair—clean hair means better grip!
-
Sectioning: Your hair gets parted in a T-shape pattern, creating clean sections that keep everything organized and precise.
-
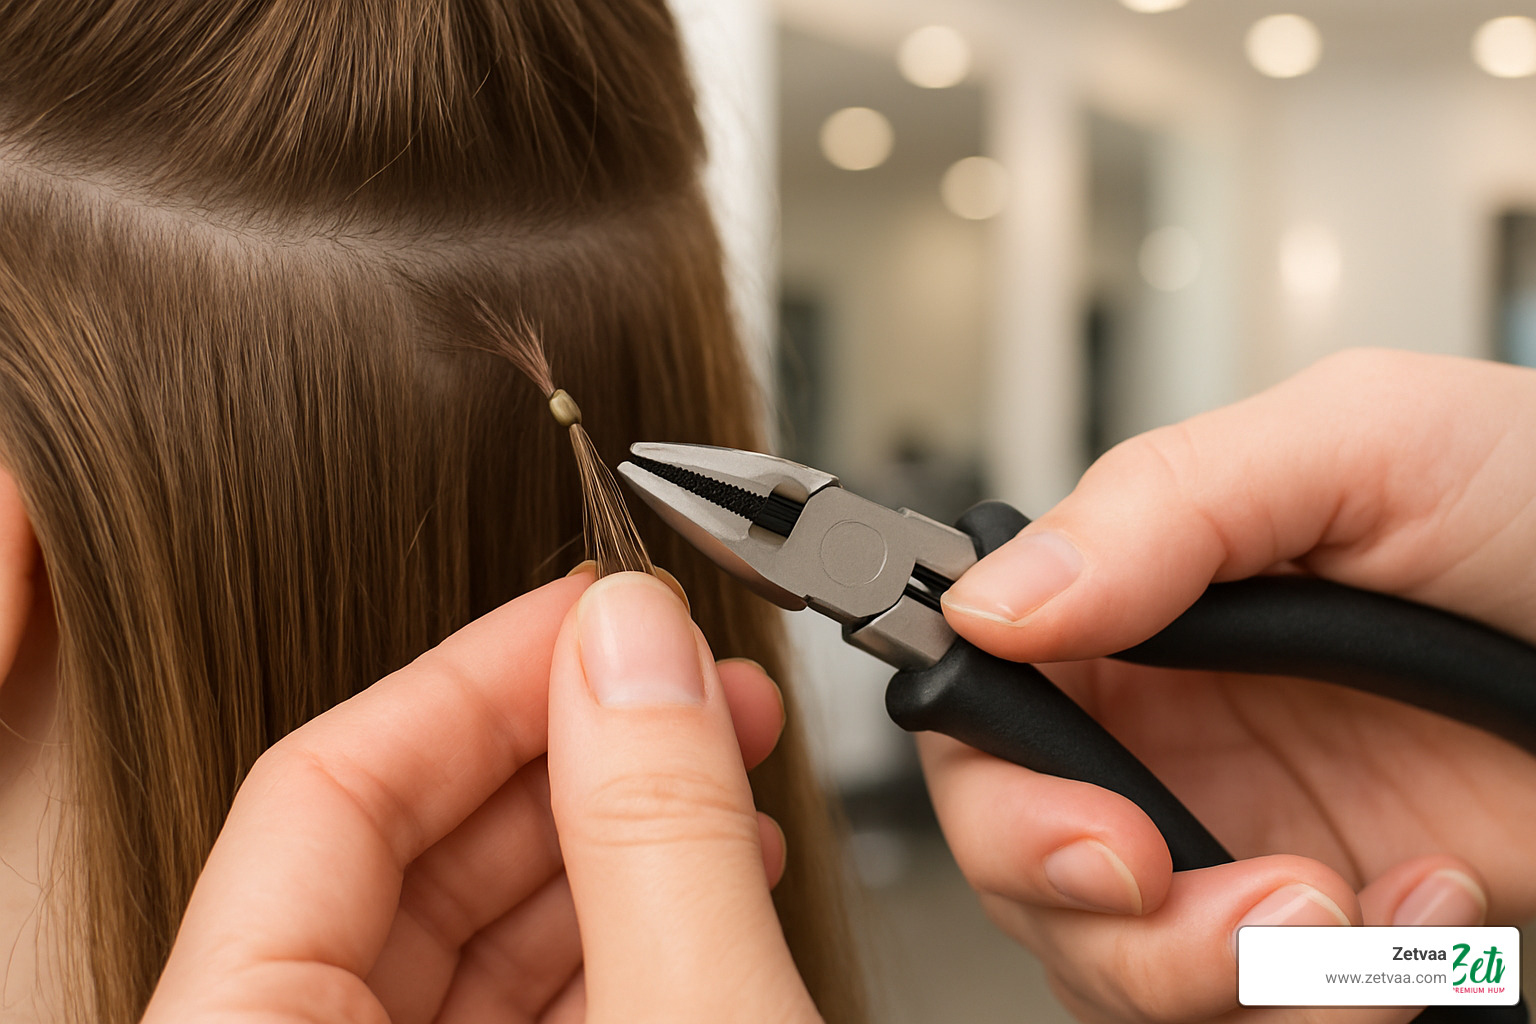
Attachment: Using a specialized loop tool (it looks a bit like a tiny fishing hook), your stylist works their magic by threading a small section of your natural hair through a silicone-lined bead, adding the I-tip extension to the same bead, then clamping it flat with special pliers.
-
Spacing: Proper spacing is crucial! Beads are typically placed about 1/2 inch apart for medium to thick hair, or 3/4 to 1 inch apart if your hair is fine—this ensures comfort and prevents any unwanted "beads showing" moments.
-
Blending: The final touch is trimming and blending the extensions with your natural hair for that "I woke up like this" seamless look.
The whole process usually takes 2-3 hours for a full head, depending on how many extensions you're getting. It's the perfect time to catch up on your favorite podcast or chat with your stylist!
Why Choose I-Tips Over Tape-Ins or K-Tips?
I-tip extensions have some serious advantages that make them worth considering:
360° Natural Movement is a game-changer—unlike tape-ins that lie flat, I-tips move naturally in all directions, so you can flip, twirl, and style your hair however you please.
They're completely heat and glue-free, making them much gentler on your natural hair compared to K-tips (keratin tips) that require heat to melt bonds. Your hair will thank you!
If you have fine or thin hair, you'll love that I-tips are fine-hair friendly. The individual strand application distributes weight evenly, so no more worrying about extensions that feel too heavy.
Being reusable makes I-tips a smart investment—quality ones can be used 3-4 times with new beads, saving you money in the long run while maintaining that gorgeous look.
Need volume in specific areas? The customizable placement lets your stylist add more or fewer strands exactly where you need them most. Want extra volume on top or just some length in the back? No problem!
Perhaps best of all is the low damage risk. When properly installed and maintained with good itip extensions care, they cause minimal stress to your natural hair, keeping it healthy while you enjoy your improved style.
Daily itip extensions care Routine: Brush, Wash, Slay
Your daily care routine can make or break the beauty and longevity of your I-tip extensions. Let's walk through the essential steps that will keep your gorgeous locks looking fabulous day after day.
Brushing & Detangling Best Practices for itip extensions care
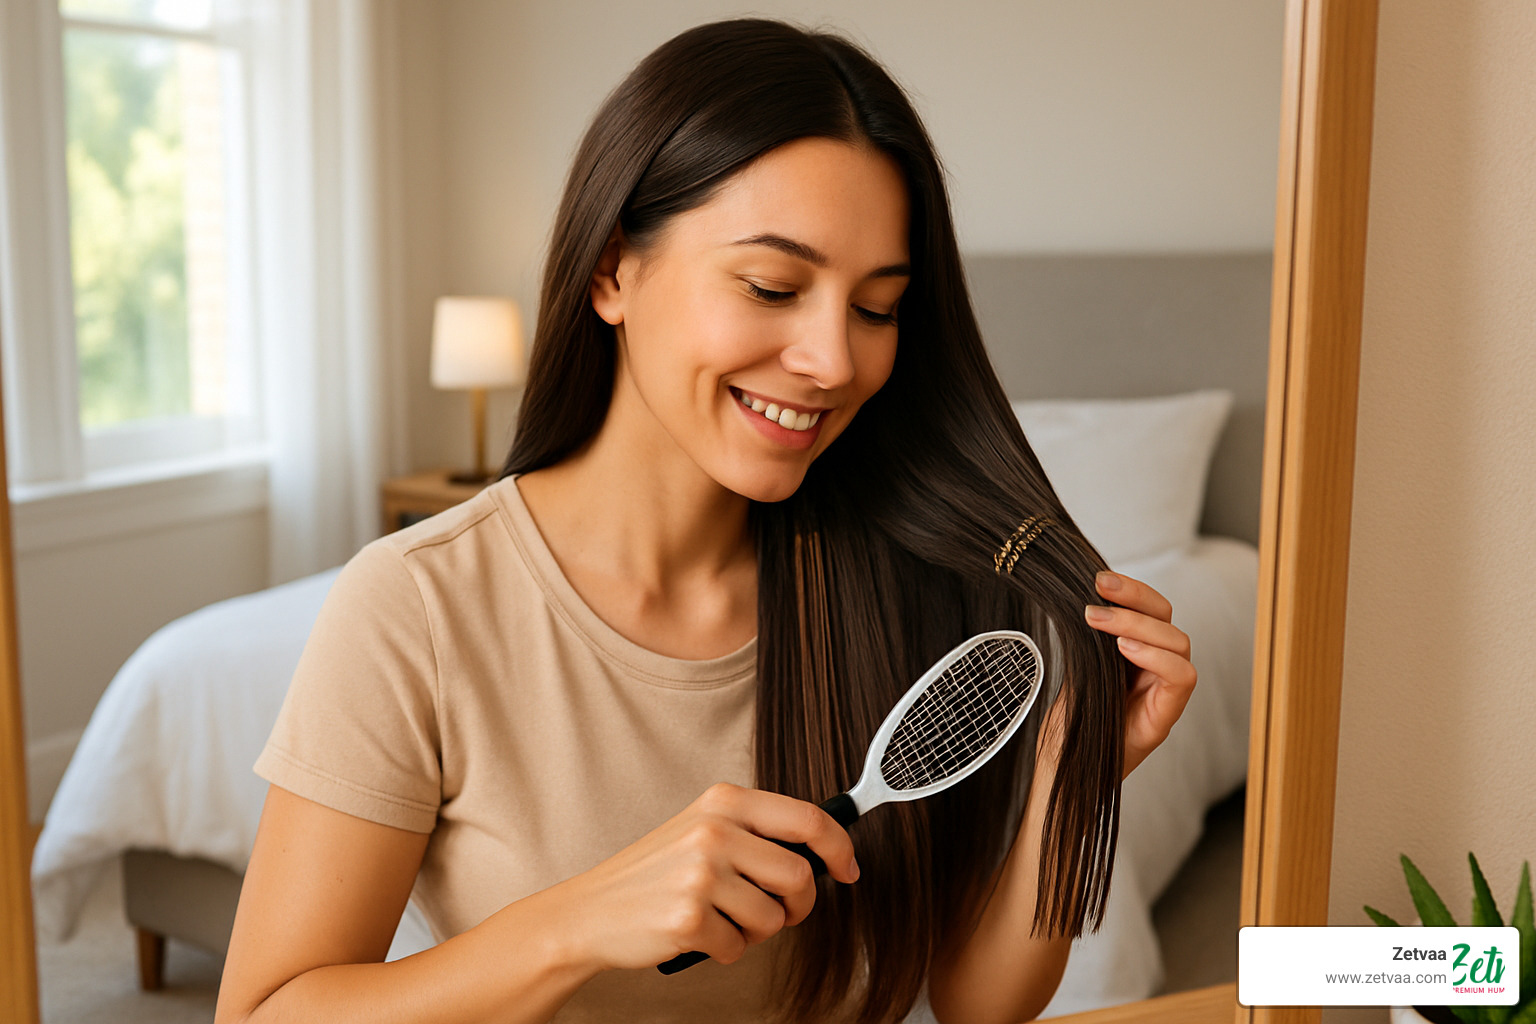
Proper brushing is the foundation of excellent itip extensions care. Think of it as the daily love your extensions need to stay tangle-free and silky smooth. Aim to brush 2-3 times daily – it only takes a minute but makes all the difference.
When brushing, always use an extension-friendly brush with looped bristles. These special brushes glide through your hair without catching on those delicate bonds. Hold your roots gently with one hand (this prevents pulling on the beads) while you brush with the other. Start at the ends and work your way up using short, gentle strokes – this is exactly opposite of how most of us were taught to brush!
Morning brushing sets you up for a great hair day by removing any sleep tangles. Toss a small extension brush in your purse for midday touch-ups (especially on windy days!), and never skip your evening brush session before bed. This simple nighttime habit prevents you from waking up with a tangled mess.
For those stubborn knots we all encounter occasionally, apply a tiny drop of extension-safe detangler to the mid-lengths and ends – but keep it well away from your bonds. Work through gently with your fingers first, then follow with your loop brush. Your extensions will thank you!
According to research from Ulta Beauty's Pro Shine Improver Brush, brushes with looped bristles can reduce breakage by up to 45% compared to standard brushes when used with extensions.
Washing, Conditioning & Product Hit-List
Washing your I-tips requires a bit more care than your natural hair did. Less is more – aim to wash just 2-3 times weekly. Overwashing can leave extensions dry and prone to tangling, while a quality dry shampoo can be your best friend between wash days.
Before any water touches your hair, thoroughly brush out all tangles. This pre-wash step is non-negotiable! Then section your hair into manageable parts for easier handling.
When washing, let water flow in the same direction as your hair strands. Apply a sulfate-free shampoo to your scalp using gentle Z-pattern movements – never circular motions that can tangle extensions. I always recommend a double-shampoo approach: rinse completely, then repeat for a truly clean scalp without buildup.
For conditioning, remember this golden rule: mid-shaft to ends only. Keep all conditioner away from those bonds! Let it sit for a few minutes before rinsing thoroughly, always directing water downward. Treat your extensions to a deep conditioning mask 1-2 times monthly, again keeping it on the lower portions of your hair only.
According to Goldie Locks research on extension-safe products, using specialized extension-friendly formulas can extend the life of your extensions by up to 30% compared to regular hair products.
| USE | SKIP |
|---|---|
| Sulfate-free shampoos | Sulfate-containing shampoos |
| Silicone-free conditioners | Heavy silicone products |
| Lightweight leave-in conditioners | Oil-based products near bonds |
| Alcohol-free styling products | Protein-heavy treatments |
| Mineral-based sunscreen | Chemical sunscreens (can discolor) |
| Extension-specific products | Regular hair masks near bonds |
Unlike your natural hair, extensions don't receive oils from your scalp, so proper hydration is essential. However, over-conditioning near the bonds can cause slippage, so maintain that safe distance from the attachment points.
Heat Styling Tips for itip extensions care
Yes, you can absolutely heat style your I-tip extensions – just with a bit more care than before! Always keep temperatures below 350°F (175°C) to preserve the integrity of your extensions.
Never skip heat protectant – it's your extensions' shield against damage. Spray it evenly through mid-lengths and ends while keeping it away from your bonds. The Unite 7Seconds protectant works beautifully with extensions without causing buildup.
After washing, gently blot (never rub!) with a microfiber towel, then allow your hair to air-dry to about 75% before reaching for the blow dryer. Use the lowest effective heat setting, rough-dry to about 90%, then finish with a round brush if desired. That final cool blast from your dryer isn't just refreshing – it seals the cuticle for added shine!

When using curling irons or straighteners, work with small sections and minimize contact time with the hot tool. Let those curls cool completely before brushing through them. Try to limit heat styling to 2-3 times weekly if possible – your extensions will stay beautiful longer with heat-free days in between.
Sleep, Exercise & Sun Exposure Dos & Don'ts
Bedtime routines matter! Never, ever go to bed with wet extensions – this is a recipe for matting disasters. Take a few minutes to brush gently before sleep, then secure your hair in a loose, low braid. A silk or satin pillowcase reduces friction dramatically (and gives you the bonus of fewer face wrinkles!). For extra protection, consider a silk wrap or bonnet.
For gym sessions, secure your hair in a style that minimizes sweat contact with your bonds. A loose braid works well, paired with a moisture-wicking headband to protect those front bonds. After working up a sweat, brush thoroughly to prevent buildup that can weaken your attachments.
Swimming requires special care. Before diving in, pre-soak your hair with fresh water (wet hair absorbs less chlorine or salt), then apply leave-in conditioner to the mid-lengths and ends as added protection. Secure in a braid or bun, and consider a swim cap for serious pool sessions. The moment you exit the water, rinse thoroughly with fresh water, then follow with a proper wash when possible.
For those sunny beach days, use a mineral-based UV protectant spray designed specifically for hair. Chemical sunscreens can discolor your beautiful extensions, so stick with mineral formulations. A stylish hat offers both sun protection and a fashion statement while protecting your investment in gorgeous hair.
At Zetvaa, we've seen how these simple daily habits can dramatically extend the life of your I-tip extensions. The few extra minutes of care each day translate to months of beautiful, tangle-free hair that moves naturally and stays looking fresh.
Maintenance, Move-Ups & Troubleshooting
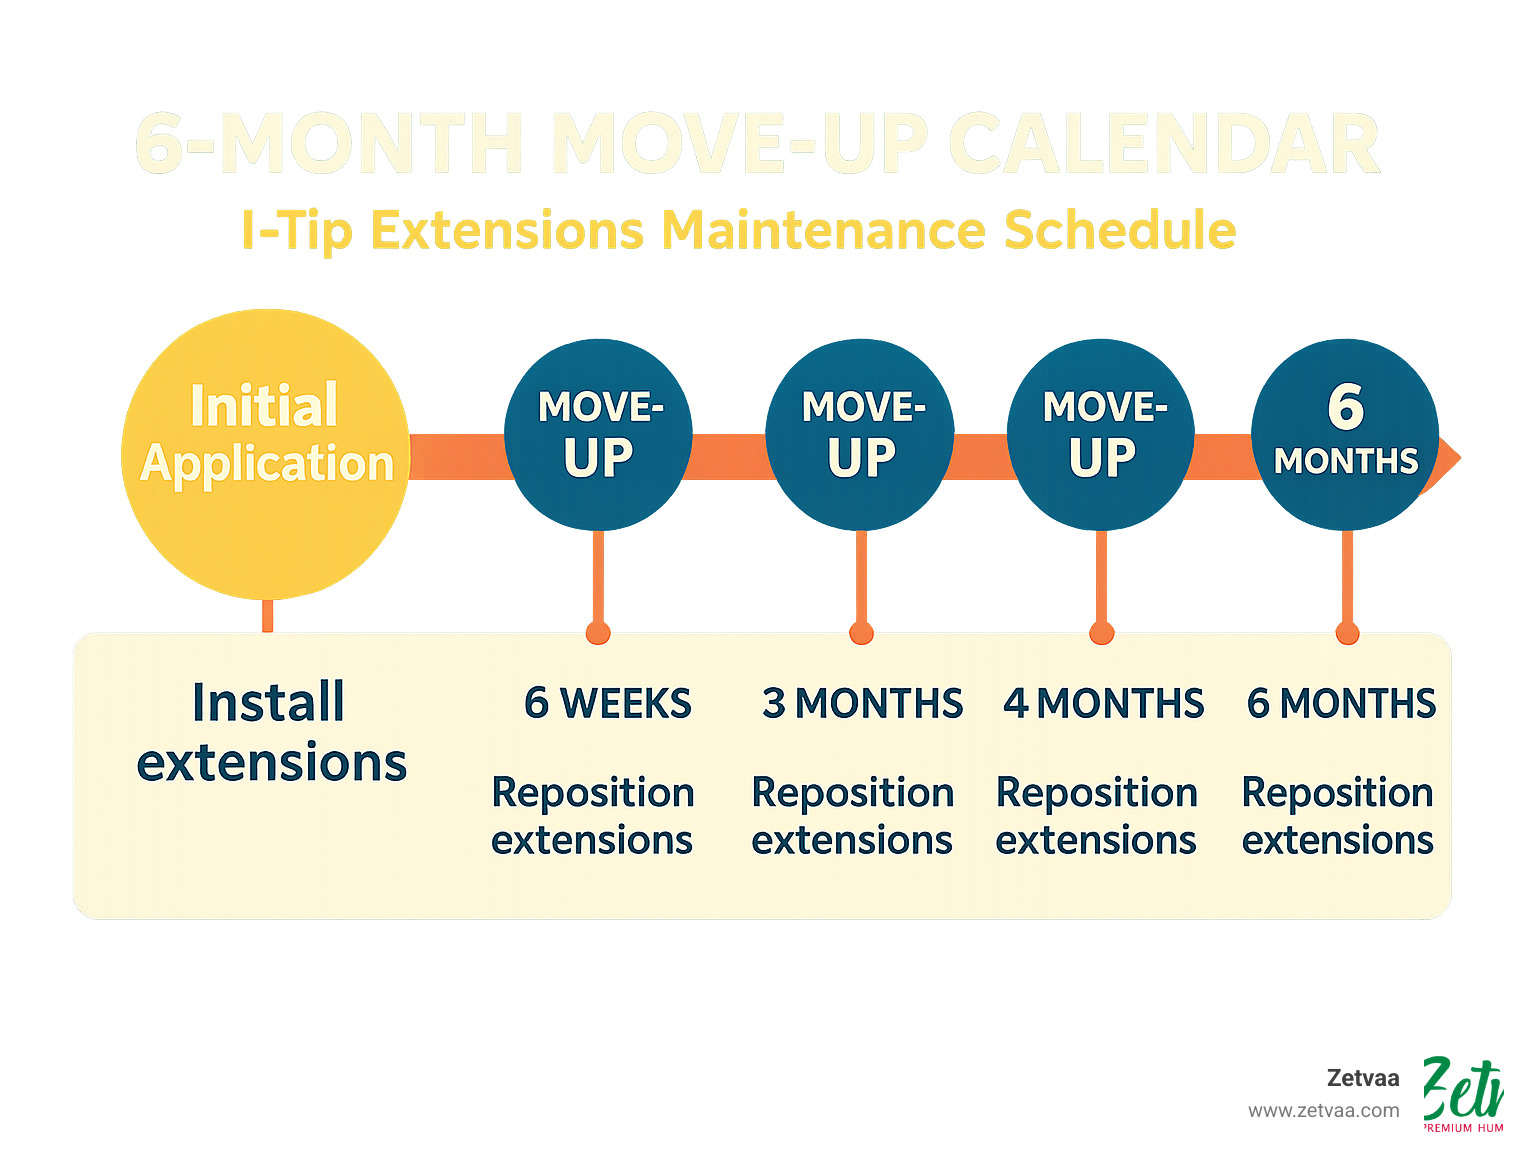
Think of your I-tip extensions like a beautiful garden that needs regular tending. Without proper maintenance, even the most gorgeous extensions can lose their luster and charm. The secret to keeping your investment looking fresh? Regular "move-up" appointments.
Understanding Move-Ups
As your natural hair grows (about half an inch per month), the beads securing your I-tip extensions gradually move away from your scalp. After approximately 6-8 weeks, these beads need a little repositioning love to keep everything looking natural and feeling comfortable.
During your move-up appointment, your stylist will work their magic by: 1. Carefully uncrimping your existing beads 2. Gently sliding them out (no yanking or pulling!) 3. Repositioning them snugly closer to your scalp 4. Re-crimping them securely in place 5. Replacing any beads that look worn or damaged
Don't skip these crucial appointments! Regular move-ups prevent unnecessary tension on your natural hair, keep your extensions looking seamlessly blended, and dramatically reduce the risk of tangling and matting. Plus, they give your stylist a chance to check on the health of your natural hair underneath—something we at Zetvaa take very seriously.
We recommend booking your move-up appointments in advance, typically every 6-8 weeks. Think of it as a standing date with gorgeous hair!
Spotting Trouble Early: Slippage, Tangling, Weak Bonds
Being a savvy extension wearer means knowing when something's not quite right. Here's how to catch small issues before they become big problems:
Signs of slippage include beads sliding down the hair shaft, extensions hanging lower than others, or suddenly visible beads that were previously hidden. You might also notice extensions feeling loose when you touch them—trust your instincts here!
What causes these issues? The usual suspects include product buildup near the bonds, excessive oil from products or your natural scalp, sleeping with wet hair (a major no-no!), or applying too much heat near the bonds. Sometimes the installation itself might need adjusting.
When it comes to tangling and matting, watch for persistent knots that return quickly after brushing or hair that feels rough and "sticky" at the mid-lengths. If you can't easily run your fingers through your extensions, something's definitely up.
If you notice these early warning signs, increase your brushing to 3-4 times daily using your extension-friendly brush. A clarifying (but still sulfate-free) shampoo can help remove buildup that might be causing slippage. You might also need to move up your move-up appointment—your stylist won't mind!
Don't wait to call your stylist if you experience scalp pain, multiple slipping beads, or severely tangled extensions. Early intervention can save both your extensions and your natural hair from damage. At Zetvaa, we believe that prevention is always better (and less expensive) than trying to fix major problems later.
Safe Removal & Reuse
When it's time to say goodbye to your current set of I-tips—whether for a complete replacement or just a break—proper removal is absolutely essential.
Professional removal is non-negotiable for maintaining the health of your natural hair. Your stylist will carefully uncrimp each bead using special pliers, gently slide out the extensions, and then lovingly detangle your natural hair. Most professionals follow this with a deep conditioning treatment to restore moisture and bounce to your natural locks.
After removal, your hair deserves a little vacation! Give your natural strands at least 1-2 weeks to breathe before reinstalling extensions. During this time, pamper your hair with hydrating masks and treatments. It's also the perfect opportunity for a trim if needed.
One of the beautiful things about quality I-tip extensions from Zetvaa is that they can be reused 3-4 times with proper care. After removal, gently wash them with sulfate-free shampoo, condition thoroughly from mid-shaft to ends, and allow them to air-dry completely on a flat surface. Store them in their original packaging or a silk storage case to keep them in pristine condition until their next use.
Before reinstallation, have your stylist inspect the extensions to ensure they're still in excellent condition. Quality extensions are an investment, and proper care between uses helps maximize that investment while keeping your hair looking absolutely fabulous.
Frequently Asked Questions about itip extensions care
How long do I-Tip extensions last with proper care?
Let's talk about what you're really wondering – how long will your investment last? With consistent itip extensions care, your gorgeous locks can stay beautiful for quite some time, though the lifespan varies depending on quality and how well you treat them.
Most standard I-tips will serve you well for 3-6 months before they need replacing. If you've invested in high-quality Remy hair extensions (like the ones we offer at Zetvaa), you're looking at a solid 4-6 months of beautiful hair days. Our premium full-cuticle options can even last an impressive 12-18 months when you give them the royal treatment!
Here's the budget-friendly news – most I-tip extensions can be reused 3-4 times with new beads, making them surprisingly economical over time. Just remember that regardless of quality, you'll still need those move-up appointments every 6-8 weeks to keep everything looking fresh and natural.
Your daily habits make all the difference. Following the care routine we've outlined throughout this guide will help you get the maximum lifespan from your extensions, giving you the most value for your investment.
Can I swim or work out regularly with I-Tips?
Absolutely! Your active lifestyle doesn't need to stop because of your gorgeous new hair – you just need a few special precautions.
For my swimming beauties, here's your poolside routine: Always pre-wet your hair with fresh water before diving in (wet hair absorbs less chlorine and salt). Apply a leave-in conditioner to mid-lengths and ends as an extra barrier, then secure everything in a neat braid or bun to prevent tangling. For serious swimmers, a swim cap provides excellent protection.
The after-swim care is just as important – rinse thoroughly with fresh water immediately after exiting the pool or ocean, then follow up with a sulfate-free shampoo as soon as possible. If you're a frequent swimmer, treat your extensions to a deep conditioning session afterward to restore moisture.
For workout warriors, itip extensions care is simpler but equally important. Secure your hair in a loose braid or ponytail during exercise, and consider using moisture-wicking headbands to keep sweat away from those bonds. A thorough brushing post-workout prevents any sweat buildup from causing problems. If you're hitting the gym daily, dry shampoo between washes will become your best friend.
Just a heads-up – if you're swimming regularly in chlorinated pools or saltwater, you might need to schedule more frequent move-up appointments (every 4-6 weeks) and expect a slightly shorter extension lifespan. It's a small price to pay for maintaining both your active lifestyle and your beautiful hair!
Will I-Tip extensions damage my natural hair?
I'm happy to reassure you that when properly installed and maintained, I-tip extensions are among the gentlest methods available for your natural hair. They don't require heat or adhesives during installation, which automatically reduces damage risk. The individual application distributes weight evenly across your head, and those clever little beads can be adjusted to prevent any uncomfortable tension.
That said, I want to be completely honest – damage can occur under certain conditions. If extensions are installed too tightly, if you skip your care routine, leave them in too long without move-ups, remove them improperly, or use products that aren't extension-friendly, your natural hair could suffer.
To keep your natural hair healthy while enjoying your extensions, always have them installed by a certified professional who understands proper placement and tension. Follow the care instructions we've shared diligently (especially the no-oils-near-bonds rule!), never skip those important move-up appointments, and always have extensions professionally removed.
It's also wise to give your natural hair occasional breaks between installations – think of it as a hair vacation! During these breaks, treat your natural hair to hydrating masks and gentle care to restore its condition.
At Zetvaa, we genuinely care about the health of your natural hair as much as the beauty of your extensions. That's why we provide comprehensive care instructions with all our extension products and use only the highest quality materials. Your hair's health is always our priority – beautiful extensions should improve your natural hair, never compromise it.
Conclusion

Taking care of your I-tip extensions doesn't need to feel like a second job, but it does require a little love and attention. Think of your extensions as an investment – the more you care for them, the more beautiful hair days you'll enjoy in return.
Proper itip extensions care comes down to creating simple, consistent habits. That morning brush before you head out the door, the gentle wash with sulfate-free shampoo, and those few extra seconds to apply heat protectant – these small moments add up to extensions that look gorgeous for months.
Remember those key practices we've discussed throughout this guide: brush gently with the right tools several times daily, wash carefully with extension-safe products, protect from heat damage, and never skip those crucial move-up appointments. Your future self (and your wallet) will thank you for taking these small but significant steps.
At Zetvaa, we've seen the difference proper care makes. Extensions treated with love can look salon-fresh for their entire lifespan, while those neglected may need replacement far sooner. We're passionate about helping you maintain that just-installed look because we know how amazing it feels when your hair looks its absolute best.
The beauty of I-tip extensions is their natural movement and versatility. With the right care routine, you'll continue to enjoy that freedom while maintaining the health of both your extensions and natural hair. No need to compromise – you really can have gorgeous, flowing locks without damage.
Don't be tempted by shortcuts! That extra five minutes of brushing or the small investment in quality extension-safe products makes all the difference between extensions that last and those that don't. Your gorgeous hair is worth those few extra moments of care.
For more guidance on finding your perfect hair match, visit our guide to selecting the best hair extensions. We're here to help you love your hair every step of the way.
Now go show off those beautiful, well-maintained extensions – you've earned every compliment coming your way!