


The Secret to Gorgeous Hair—Itip Extensions Maintenance Simplified
Why I-Tip Extensions Maintenance Matters for Long-Lasting Beauty
Itip extensions maintenance is the key to keeping your hair looking gorgeous for months, not weeks. With proper care, your I-tip extensions can last 4-6 months per installation, and the hair itself can be reused for up to 3 years.
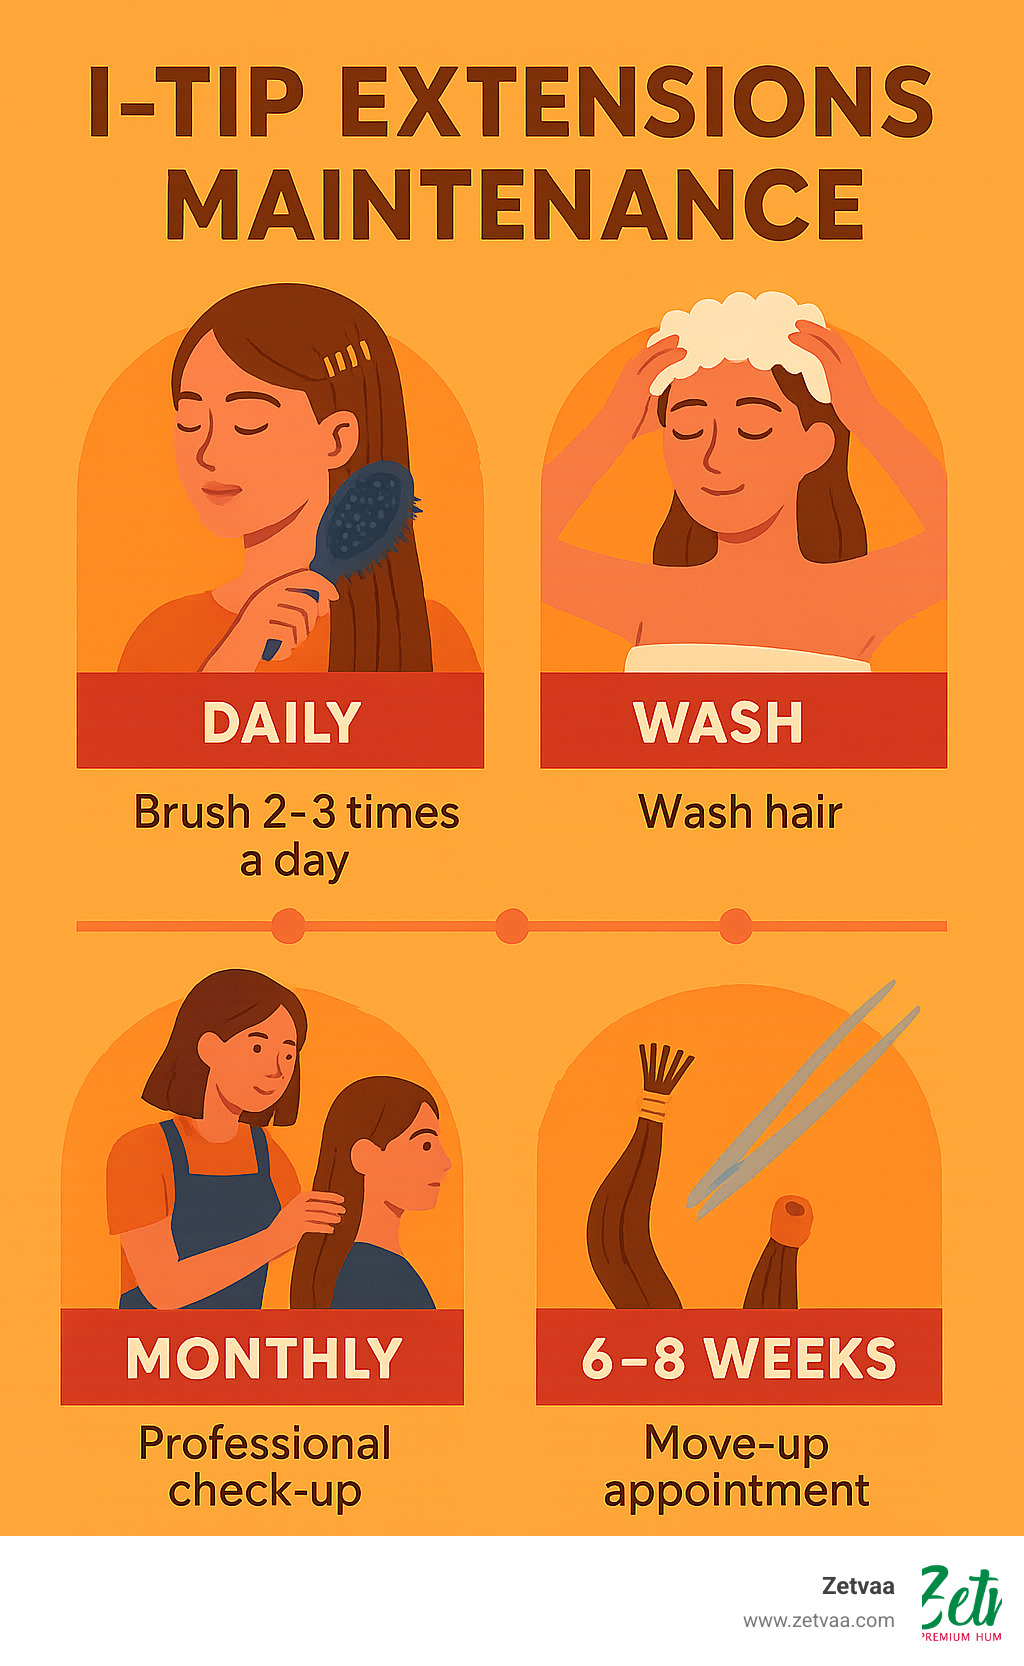
Quick I-Tip Extensions Maintenance Essentials:
- Brush 2-3 times daily with a loop brush, starting from tips
- Wash only 2-3 times per week with sulfate-free products
- Always blow-dry completely - never sleep with wet extensions
- Schedule move-ups every 6-8 weeks to prevent damage
- Use heat protectant and keep styling tools under 356°F (180°C)
- Sleep in loose braids to prevent tangling
I-tip extensions use small copper beads with silicone lining to attach individual hair strands without heat or glue. This gentle method makes them perfect for adding length and volume while protecting your natural hair.
The secret to gorgeous extensions isn't just buying quality hair - it's following the right maintenance routine. Poor care can turn premium extensions into a tangled mess within weeks, while proper maintenance keeps them looking salon-fresh for months.
This guide breaks down everything you need to know about caring for your I-tip extensions, from daily brushing techniques to professional move-up schedules. You'll learn exactly how to protect your investment and keep your hair looking flawless every day.
Quick itip extensions maintenance terms: - Hair Extension Care
Why This Guide Matters
We've seen too many people invest in beautiful extensions only to watch them deteriorate from poor care. Your natural hair health depends on proper extension maintenance - neglected extensions can cause breakage, matting, and scalp irritation. But when you follow our proven maintenance routine, you'll enjoy long-term hair health and the confidence boost that comes with gorgeous, flowing locks every single day.
Understanding I-Tip Extensions
Think of I-tip extensions as the gentle giants of the hair extension world. Each strand gets attached individually using tiny copper beads lined with silicone - no heat, no glue, no harsh chemicals. It's like giving each piece of hair its own little protective home.
The strand-by-strand application creates the most natural movement you'll ever see in extensions. While other methods can leave you feeling like you're wearing a helmet, I-tips move and flow just like your own hair because, well, they're attached just like your own hair grows - one strand at a time.
Those little copper-silicone beads are actually pretty brilliant. The copper gives them strength to hold securely, while the silicone lining acts like a cushion for your natural hair. This heat-free method means no risk of burns during application and no damaged hair from high temperatures.
Here's something that surprises many people: I-tips work beautifully on fine or thin hair. Because the weight gets distributed strand by strand instead of in chunky sections, there's no heavy pulling on any one area of your scalp. Your head will thank you for choosing such a gentle method.
The reuse potential is where I-tips really shine. Quality extensions can be moved up and reused multiple times - we're talking about getting 1-3 years of gorgeous hair from one investment. That's pretty amazing when you think about it.
| Extension Type | Lifespan | Reuse Potential | Heat Required | Maintenance Frequency |
|---|---|---|---|---|
| I-Tip | 4-6 months | Up to 3 times | No | 6-8 weeks |
| K-Tip | 4-6 months | Limited | Yes | 4-6 months |
| Tape-In | 6-8 weeks | Up to 3 times | No | 6-8 weeks |
Installation 101
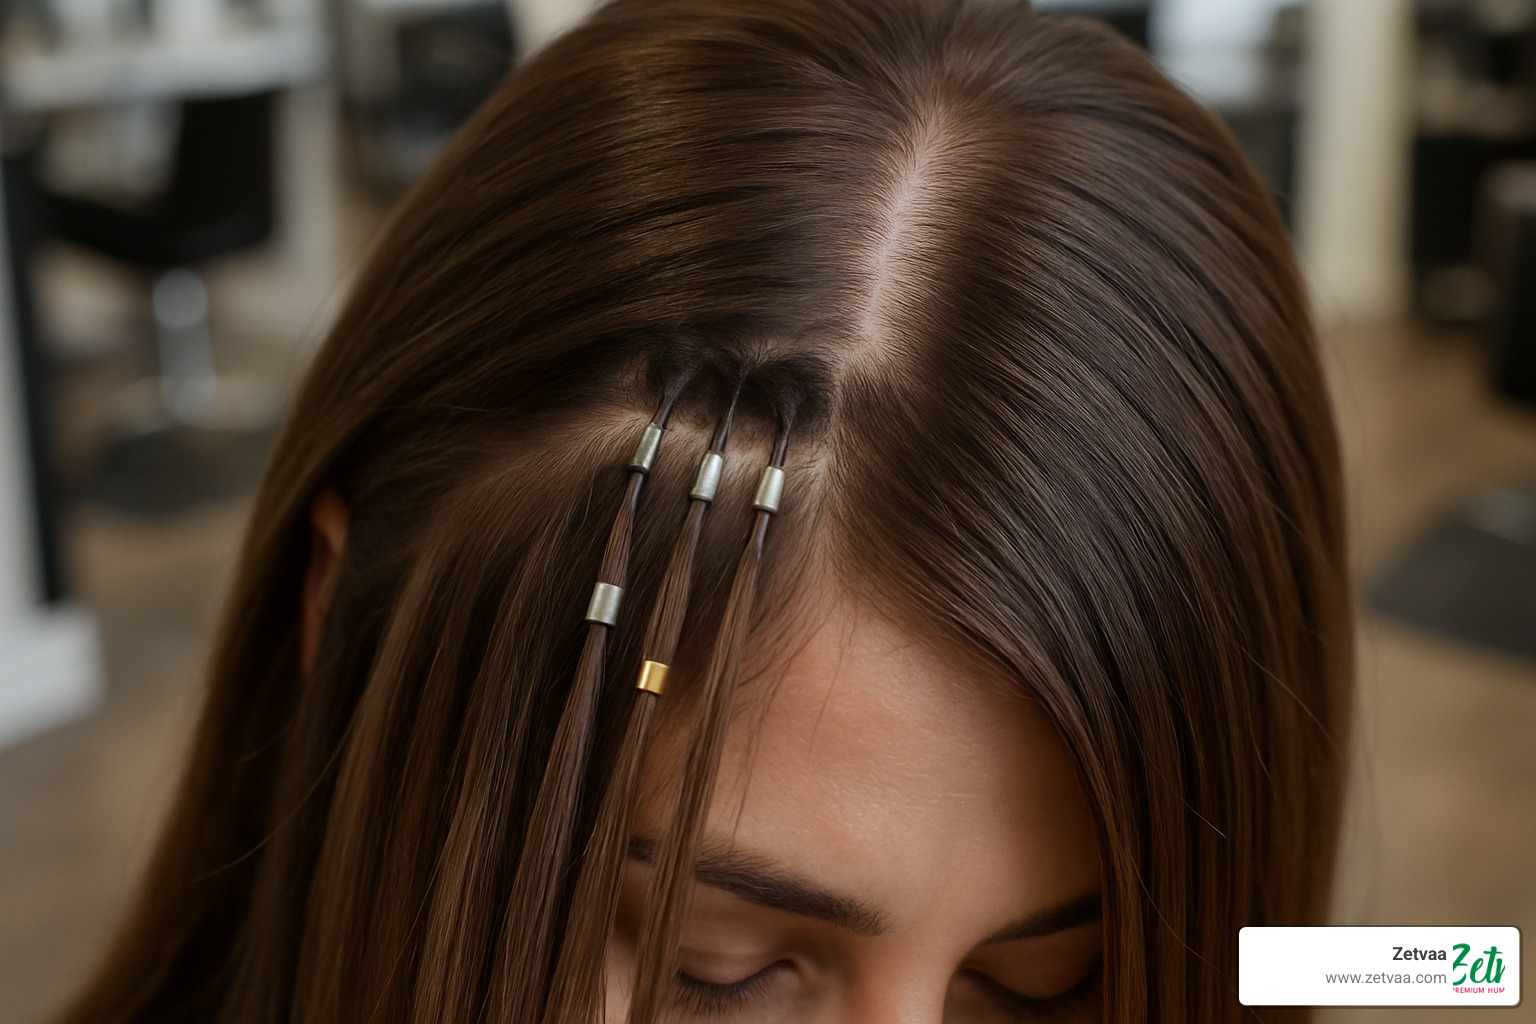
Getting I-tips installed is like watching an artist at work. Your stylist starts by sectioning your hair into precise horizontal rows - each section needs to match the width of the extension strand for perfect blending.
The magic happens with bead threading. Using a special loop tool, your natural hair gets threaded through a copper bead, then the I-tip extension slides right in beside it. The final step is clamping the bead flat with professional pliers - not too tight, not too loose, but just right to create a secure hold.
Placement matters more than you might think. Those beads need to sit about 1/4 inch from your scalp, giving your natural hair room to grow without creating uncomfortable tension. The whole process takes 2-3 hours for a full head, but trust us - it's time well spent.
Pros and Cons Snapshot
I-tips bring some serious volume and natural movement to your hair game. The discreet bonds practically disappear into your hair, and you can style them however you want. The fact that they're reusable makes them a smart financial choice too.
But let's be real - they do require regular move-ups every 6-8 weeks, and the DIY limits mean you'll need professional help for installation and removal. The initial investment can feel steep, but remember, you're paying for months of gorgeous hair that can be reused multiple times.
Lifespan & Reusability
Your I-tips will happily live in your hair for 4-6 months before they need a move-up appointment. But here's the beautiful part - the actual hair extensions can keep going for 1-3 years with proper itip extensions maintenance.
Hair quality makes the biggest difference in longevity. Full cuticle hair can last 12-18 months, while Remy hair typically gives you 4-6 months of beautiful wear. Your lifestyle plays a role too - if you're hitting the gym daily or swimming regularly, you might need more frequent touch-ups.
The real game-changer is your care routine. Proper brushing and washing can literally double the life of your extensions. And those professional maintenance appointments? They're not just about looks - they prevent damage that could end your extensions' life early.
Scientific research on hair breakage shows that proper tension distribution prevents natural hair damage, which explains why I-tips' individual strand method works so well for long-term hair health.
Daily Itip Extensions Maintenance Routine
Taking care of your I-tip extensions doesn't have to feel overwhelming. Think of it like caring for a beautiful silk blouse - with the right routine, it stays gorgeous for years. Your itip extensions maintenance routine is what transforms a good investment into a great one.
The secret is consistency. Just like your natural hair, extensions respond best to gentle, regular care rather than sporadic deep treatments. When you skip a day of brushing, those tiny tangles multiply overnight into stubborn knots that take forever to work out.
Brushing is your daily non-negotiable. Use a loop brush or soft-bristle extension brush, and always start at the tips. This might feel backwards at first, but it prevents the pulling and tugging that happens when you brush from roots down. Hold the hair right at the bonds while you brush - this takes the tension off your natural hair and keeps everything comfortable.
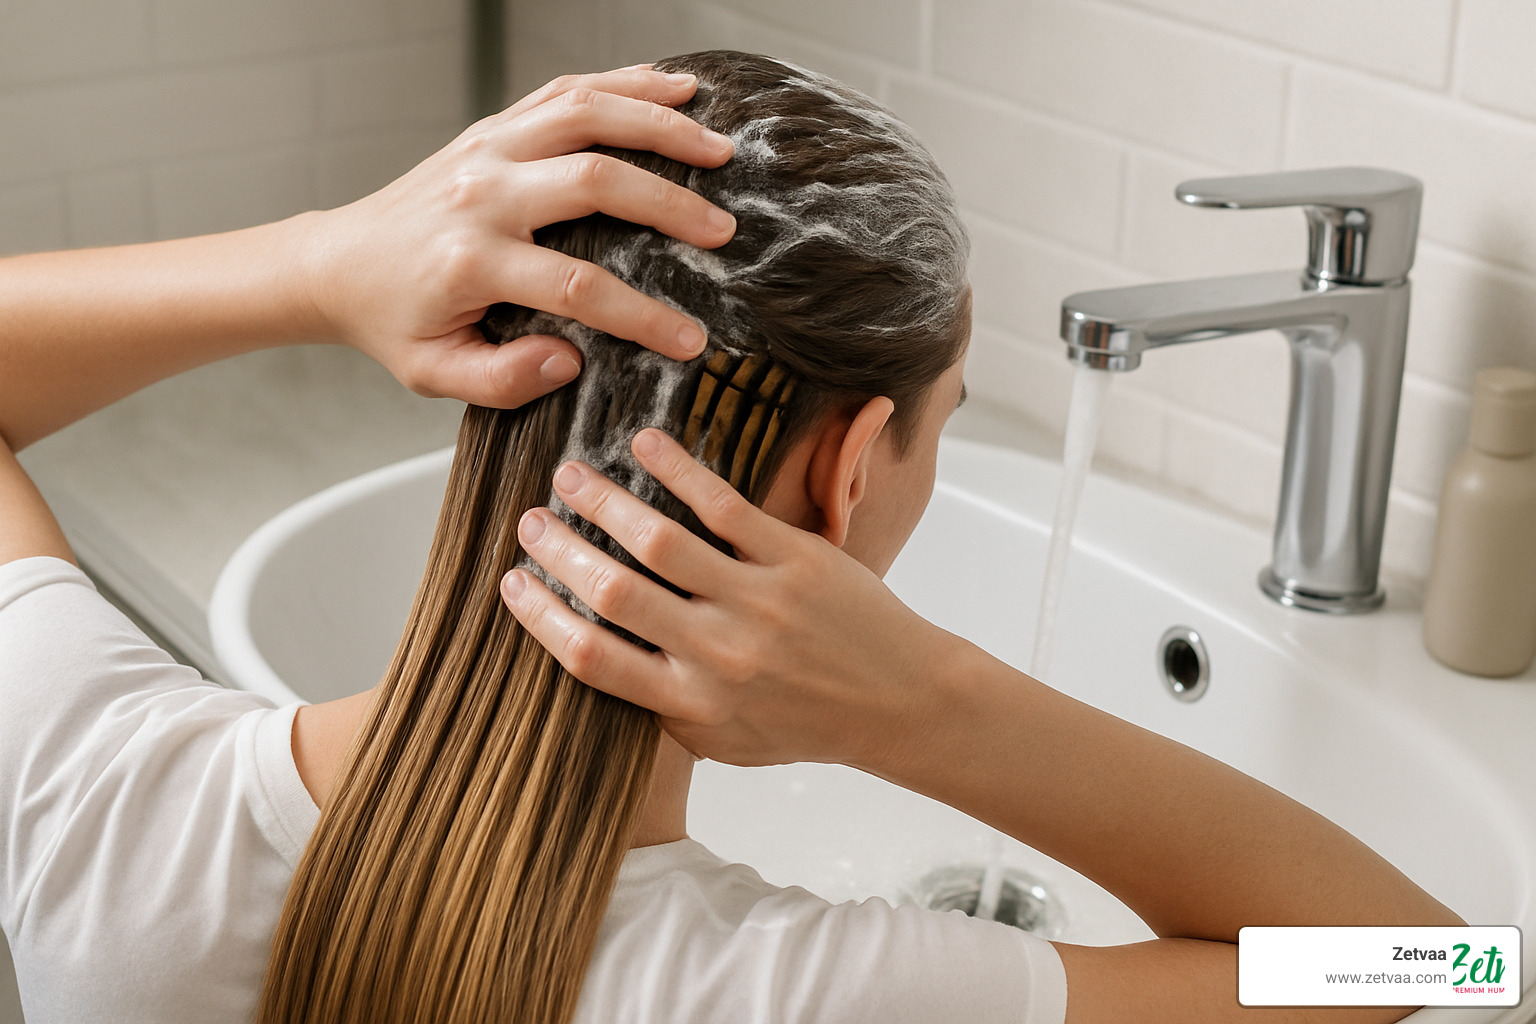
Washing requires a gentler approach than your natural hair routine. Sulfate-free, paraben-free products are essential because harsh chemicals can weaken the bonds and strip the hair of its natural moisture. When you're in the shower, think vertical motions instead of circular scrubbing. Let gravity help you as you work the shampoo through your hair.
Drying completely is absolutely critical. Wet extensions are like wet cardboard - they lose their strength and can fall apart. The copper beads can corrode if they stay damp, and the hair itself becomes a breeding ground for bacteria. Never, ever go to bed with damp extensions. It's the fastest way to turn beautiful hair into a matted mess.
Product choices make or break your extensions. Avoid anything with sulfates, parabens, or high alcohol content near the bonds. These ingredients are like kryptonite to extension bonds - they cause slippage and deterioration faster than you'd believe.
Morning & Night Itip Extensions Maintenance Checklist
Your morning routine sets the tone for how your hair behaves all day. Start with gentle detangling using the bottom-up technique - it's like untying a delicate necklace. You wouldn't yank on a tangled chain, so treat your extensions with the same patience.
Hold the hair at the bonds while brushing to prevent any pulling on your natural hair. This simple technique prevents headaches and protects your scalp from unnecessary stress. Apply leave-in conditioner to the mid-lengths and ends only, keeping it away from the bonds where it could cause slippage.
Your nighttime routine is damage prevention in action. Brush through any tangles that built up during the day - they're always easier to remove when they're fresh. Create a loose braid or low ponytail to keep everything contained while you sleep. Think "gentle restraint" rather than tight control.
A silk or satin pillowcase is worth its weight in gold for extension care. Cotton creates friction that leads to tangles and frizz, while silk lets your hair glide smoothly as you move in your sleep.
Wash Day Rules for Itip Extensions Maintenance
Less is definitely more when it comes to washing frequency. Limit yourself to 2-3 times per week maximum. Your extensions don't produce natural oils like your scalp does, so over-washing just strips away moisture and shortens their lifespan.
Focus your shampooing efforts on your scalp, not the extension hair. Use your fingertips to gently massage the scalp, letting the suds clean the lengths as you rinse. It's like washing a delicate sweater - you want to be thorough but gentle.
Conditioner placement is crucial. Apply it only to the mid-lengths and ends of your extensions, staying far away from the bonds. Heavy conditioners near the beads can cause slippage, and nobody wants to find their extensions on their pillow in the morning.
Blow-drying isn't optional - it's essential. Start with the roots and bonds, using medium heat to ensure everything gets completely dry. Work in sections so you don't miss any damp spots. Those bonds need to be bone dry to maintain their integrity.
The golden rule: never sleep with wet extensions. This single mistake ruins more extensions than any other care error. Wet bonds become soft and can slip out, while damp hair creates the perfect environment for matting and even mold growth.
Heat Styling & Product Must-Haves
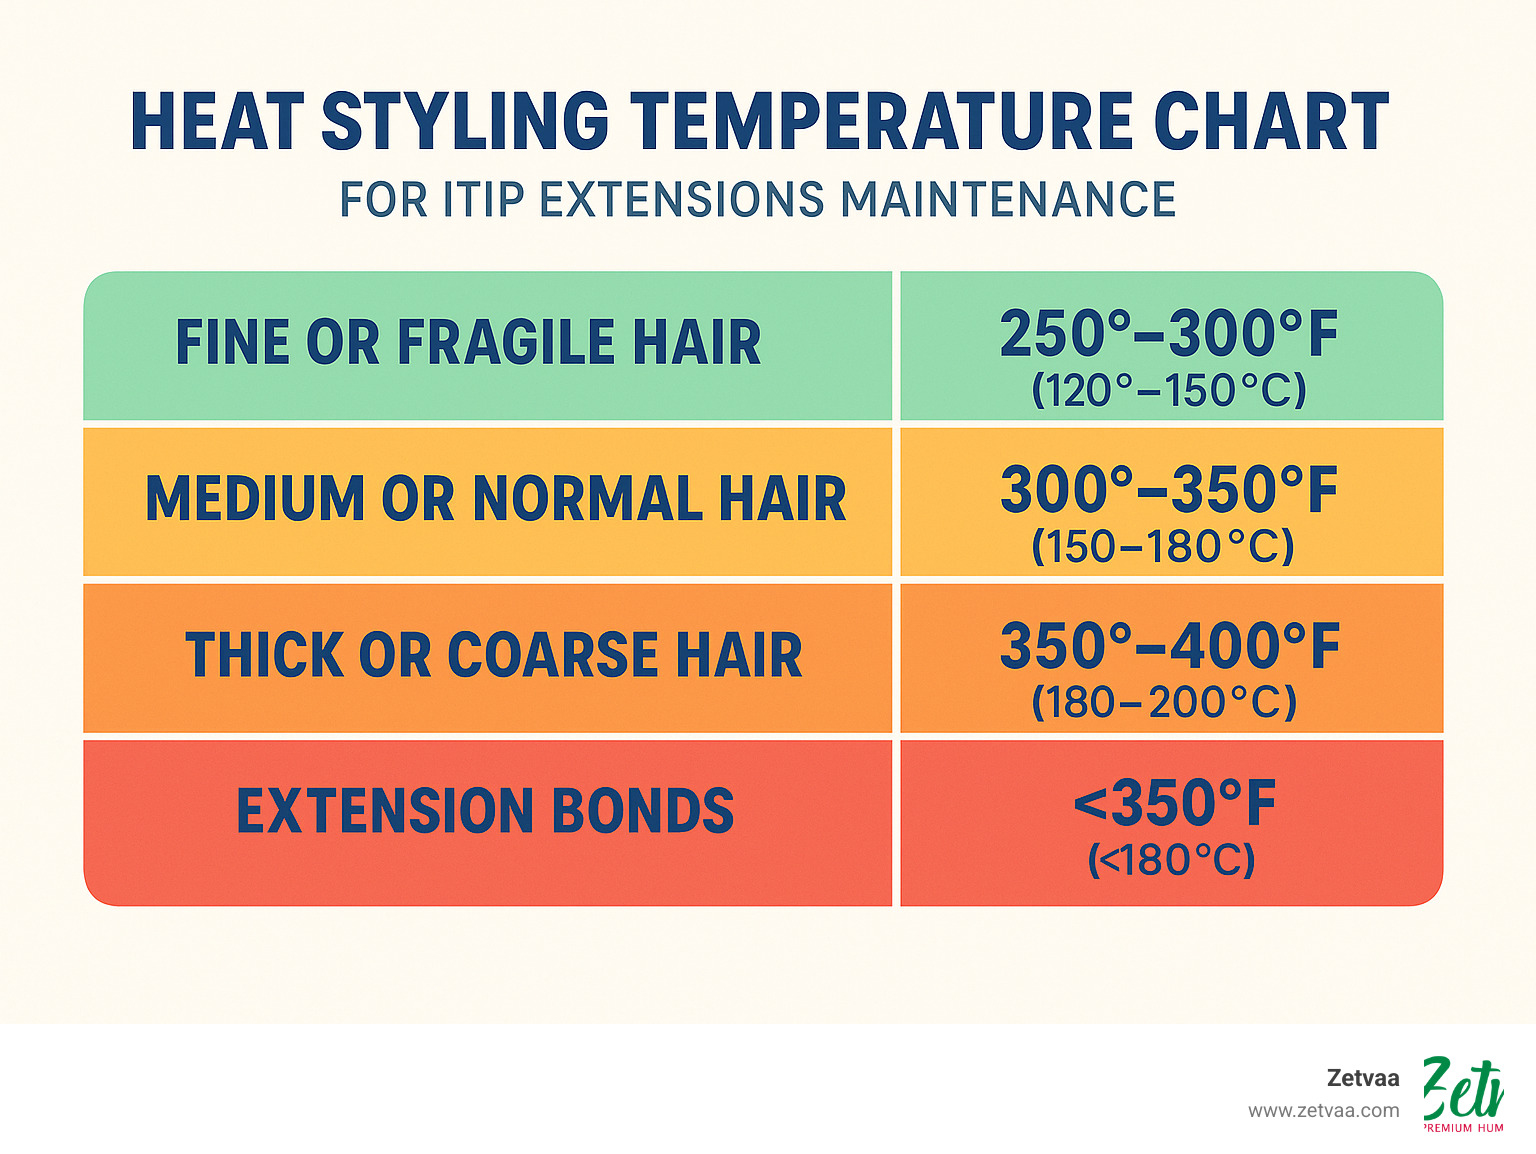
Heat protectant is your insurance policy against styling damage. Apply it evenly through the mid-lengths and ends, avoiding the bonds completely. Think of it as sunscreen for your hair - you wouldn't skip it on a beach day, so don't skip it on styling days.
Keep your styling tools at or below 356°F (180°C). Higher temperatures might work faster, but they're like putting your extensions in an oven. Lower heat takes a bit more time but preserves the hair quality and keeps your investment looking fresh longer.
Alcohol-free products are your friends. High alcohol content turns extensions brittle and dry over time. Look for moisturizing formulas that add shine and manageability instead of stripping away moisture.
Dry shampoo is a game-changer for extending time between washes. Apply it only to your roots, staying away from the bonds, to absorb excess oil and add volume. It's like a refresh button for your hair between wash days.
Salon Upkeep & Replacement Timeline
Professional move-up appointments are essential every 6-8 weeks. As your natural hair grows, the beads move away from your scalp, creating visible gaps and potential tangling issues. Regular move-ups keep your extensions looking seamless and prevent damage.
During move-up appointments, your stylist will remove the old beads, gently slide the extensions up closer to your scalp, and install new beads. This process typically takes 1-2 hours and costs significantly less than a full installation.
Bead rotation is important for preventing damage to your natural hair. Your stylist should vary the placement slightly with each move-up to avoid creating weak spots or breakage patterns.
Professional removal is crucial when it's time for a break or replacement. DIY removal often results in hair breakage or extension damage that could have been avoided with professional techniques.
Cost planning helps you budget for ongoing maintenance. Factor in move-up appointments, products, and eventual replacement when calculating the true cost of I-tip extensions.
Scheduling & Budgeting
Move-up appointments typically cost $75-$200 depending on your location and stylist. This investment protects both your natural hair and your extensions, making it worthwhile for long-term hair health.
Plan for a full refresh annually if you're reusing your extensions. This involves professional deep conditioning, trimming split ends, and potentially replacing some strands that have reached the end of their lifespan.
Before travel or vacation, schedule a move-up appointment to ensure your extensions are secure and properly maintained. Nothing ruins a vacation like extension emergencies in an unfamiliar location.
Book appointments in advance, especially during busy seasons. Good extension stylists often have waiting lists, so planning ahead ensures you get the care you need when you need it.
More info about maintenance timing
When to Replace or Refresh
Watch for these signs that indicate it's time for replacement:
Excessive tangling that doesn't improve with proper brushing suggests the hair cuticles are damaged beyond repair. This usually occurs after 4-6 months of wear.
Slippage where beads slide down despite proper installation indicates bond failure or natural hair growth that's beyond the safe adjustment range.
Volume loss happens as individual strands shed naturally over time. When you notice significantly less fullness, it's time for fresh extensions.
Discomfort should never be ignored. If your extensions feel heavy, tight, or cause headaches, schedule an immediate consultation with your stylist.
Troubleshooting & Lifestyle Tips
Let's be honest - even with perfect itip extensions maintenance, life happens. You might wake up with a mysterious tangle, or your workout routine might leave you wondering how to keep your extensions looking fresh. The good news? Most problems have simple solutions.
Tangles and matting are the most common issues, and they're usually preventable with daily brushing. But when you find yourself facing a stubborn knot, don't panic. Never attack dry tangles with aggressive brushing - you'll only make things worse. Instead, spray the area with a detangling product and work slowly from the bottom up with your fingers first, then follow with your loop brush.
Swimming doesn't have to mean sacrificing your gorgeous hair. Before you dive in, braid your hair securely and apply a leave-in conditioner from mid-length to ends. This creates a protective barrier against chlorine and saltwater. The moment you're out of the water, rinse thoroughly with fresh water and apply a deep conditioning treatment. Don't wait until you get home - chemicals become more damaging the longer they sit on your hair.
Your gym routine can coexist beautifully with I-tip extensions. Secure your hair in a loose bun or braid before working out, and consider using a sweat-wicking headband to keep moisture away from the bonds. After intense sessions, a gentle scalp rinse with cool water removes salt and bacteria without requiring a full wash.
Hard water can be a silent extension killer, causing mineral buildup that makes your hair look dull and feel rough. If you notice your extensions losing their shine despite proper care, consider installing a shower filter. It's a small investment that pays for itself by extending your extensions' lifespan.
Scalp care often gets overlooked, but it's crucial for healthy extensions. During your twice-weekly washes, gently massage your scalp with your fingertips to promote circulation and prevent buildup around the bonds. Your natural hair needs attention too!
Latest research on chlorine damage confirms what we've seen - chlorine exposure significantly weakens hair structure, making protection absolutely essential for extension wearers.
Active Life Hacks
Travel smart by packing a small spray bottle with diluted leave-in conditioner. This emergency detangler has saved countless vacation photos when regular products weren't available.
For pool days, think of your extensions like a delicate fabric. You wouldn't throw silk in chlorinated water without protection, so treat your hair with the same care. Apply that protective conditioner, braid securely, and rinse immediately after swimming.
Post-workout hair care doesn't have to be complicated. A quick cool-water rinse focused on your scalp removes sweat and bacteria without stripping your extensions. Save the full wash for your scheduled wash days.
Common Mistakes to Avoid
We've seen these mistakes countless times, and they're all easily preventable with the right knowledge.
Over-washing is the biggest culprit behind premature extension failure. More than three washes per week strips the natural oils that keep extensions soft and manageable. When your roots feel oily, reach for dry shampoo instead of the shower.
Oil-based products near the bonds cause slippage faster than almost anything else. Keep all oils, serums, and heavy conditioners at least two inches away from your scalp. Your bonds will thank you by staying secure longer.
Skipping the blow-dry might seem like a time-saver, but it's actually a recipe for disaster. Wet bonds soften and can slip out overnight, while damp hair creates the perfect environment for mold and mildew. Trust us - the extra 10 minutes of drying time is worth it.
DIY removal is tempting when you're ready for a change, but it's one of the most expensive mistakes you can make. Professional removal protects both your natural hair and your extensions, allowing for potential reuse. The money you save on removal often gets spent replacing damaged hair.
Frequently Asked Questions about I-Tip Extension Care
We get these questions all the time from our clients, and honestly, they're great questions! Proper itip extensions maintenance can feel overwhelming at first, but once you understand the basics, it becomes second nature.
How often must I schedule move-ups?
Here's the thing about move-ups - they're not optional, even when your extensions still look amazing. Every 6-8 weeks, you need that professional appointment, period.
Your natural hair doesn't take a break from growing just because you have extensions. As it grows, those beads move further from your scalp, creating gaps that look obvious and can cause serious tangling issues. We've seen people try to stretch it to 10 or 12 weeks to save money, but they always end up paying more in the long run when their extensions get damaged.
Think of move-ups like oil changes for your car - regular maintenance prevents expensive problems down the road. Your stylist will gently slide those extensions back up where they belong and replace the beads, keeping everything secure and natural-looking.
Can I color or tone my I-Tip extensions?
The short answer is yes, but there's definitely a right way and a wrong way to do it. High-quality human hair extensions can absolutely be colored, but please, please don't try this at home!
Extensions have already been through processing before they reached you, which means they'll react differently to color than your natural hair. A professional colorist who knows extensions will understand how to work with this pre-processed hair and can predict how it'll take the color.
Toning is usually much safer than dramatic color changes. If you want to go from blonde to brunette or add some highlights, that's totally doable with the right professional. But bleaching? That's where things get tricky. Bleach can really weaken the hair structure, and since your extensions need to last months, you don't want to compromise their strength.
The best part about quality extensions is that they're an investment in versatility - just make sure you protect that investment with professional color services.
Will Itip extensions maintenance damage my natural hair?
This is probably our most common concern, and we totally get it! When done right, I-tip extensions actually protect your natural hair rather than damage it. It sounds counterintuitive, but hear us out.
The individual strand method spreads the weight evenly across your entire head instead of putting stress on just a few areas. Those silicone-lined beads create a protective barrier between the copper and your hair, preventing friction damage that you might get with other methods.
But - and this is important - proper maintenance is absolutely crucial. Skipping move-up appointments, trying to remove them yourself, or ignoring your daily care routine? That's when damage happens. It's not the extensions themselves causing problems; it's usually poor care or leaving them in too long.
We've actually had clients tell us their natural hair grew stronger and healthier while wearing I-tips because the extensions encouraged them to follow a better hair care routine. When you're investing in gorgeous extensions, you naturally start using better products and being gentler with your hair overall.
The key is following your maintenance schedule religiously and working with a stylist who really knows what they're doing. Do that, and your natural hair will thank you!
Conclusion
Your journey with itip extensions maintenance doesn't end when you leave the salon - it's just the beginning of months of gorgeous hair that makes you feel amazing every single day.
Think of proper maintenance as your daily investment in confidence. Those few extra minutes brushing gently from bottom to top, choosing sulfate-free products, and sleeping in a loose braid add up to extensions that look salon-fresh for months instead of weeks.
The difference between extensions that last 6 weeks and those that thrive for 6 months comes down to consistency in your care routine. It's not complicated, but it does require commitment. When you follow the gentle daily brushing, limited washing schedule, complete drying routine, and regular professional maintenance we've outlined, you're protecting both your investment and your natural hair health.
We've seen too many people get frustrated with extensions because they skipped the basics. But we've also watched clients fall in love with their hair all over again when they accept proper care. The choice is yours - and honestly, once you develop these habits, they become second nature.
At Zetvaa, we carefully select high-quality human hair extensions specifically because we know they respond beautifully to proper maintenance routines. When you start with premium hair and treat it with the care it deserves, the results speak for themselves.
Your extensions are more than just hair - they're your confidence boost, your style statement, and your daily reminder that you're worth the extra effort. Premium itip extensions maintenance isn't just about following rules; it's about loving yourself enough to do the little things that make a big difference.
More info about choosing the best hair extensions
Every time you reach for that loop brush or choose the gentle shampoo, you're choosing months of beautiful hair over weeks of regret. Your future self will thank you for the care you give your extensions today.